
Setting up a Christmas Tree
8th Oct 2015

Setting up the Christmas tree is a family tradition and is meant to be an easy and fun experience. When you have purchased a tree from Father Christmas it is a pleasure to set up your Christmas tree as inside your carton you will find your guarantee card, a useful instruction sheet on branch shaping and a branch colour count and assembly sheet.
We have put together the following guide to assist in creating a professional looking Christmas tree using minimal time and effort.
Remove your Christmas tree from the box. (The box should be kept for future storage of the tree)
Sort the branches according to the colour coding on the stem of each branch.
The metal stand is in a plastic bag in your box. Please read the instructions on the bag carefully as it will help make the assembly of your stand easier and keep your tree sturdy and secure.
Swing open stand legs to 90°. Place on floor and secure the bottom section of tree pole by hand tightening screws evenly, keeping the screws straight as you tighten.
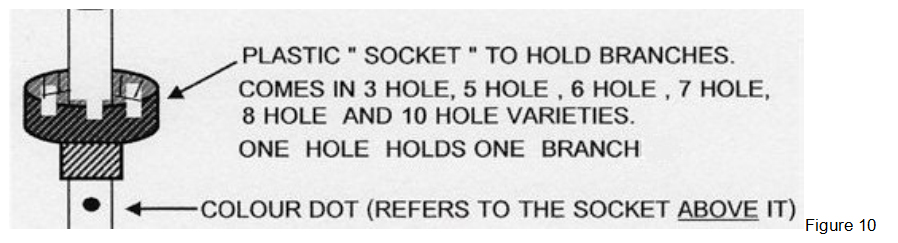
Assemble the other pole sections keeping all the colour dots on each pole facing you, so that you can attach the same colour branch into the plastic socket on the pole, according to the coloured dot. Dot is below socket.(Fig 10)
Begin shaping the lowest branches first and work your way up to the top. [Trees above 3 metres start at top and work down]
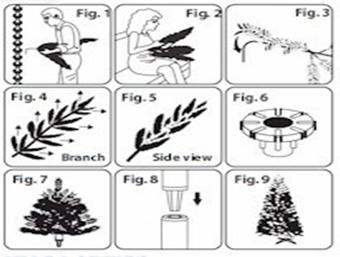
Shape the branch by securing it into the socket [Fig 1 & 6] or holding the branch straight at a comfortable level [Fig 2] (hook facing down) as if it were already hooked into the socket on the pole and begin to open tips
Work
from the hook end outwards toward the front tip in a fan shape formation and angled
as indicated and as shown [Fig 3][Fig 4] and [Fig 5]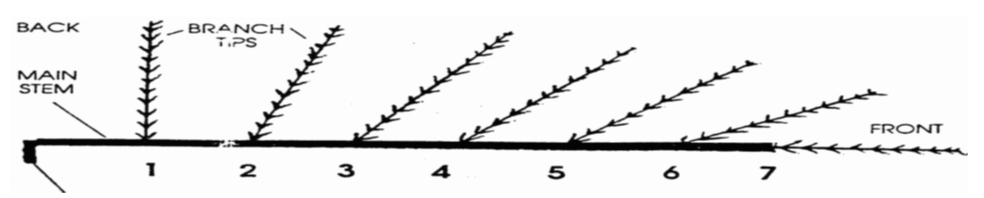
Tips should be offset from each other so that they do not line up one behind the other.
Keep the longest tip on each branch facing forward and curved slightly upward at the end.
Hook one branch at a time into the socket according to the colour dot (dot is located below socket) and complete the row on that socket before moving up to the next socket.
If you have “side wings” on the branches pull out to left and right and shape in a similar pattern as above.
When you have shaped and hooked all the branches into the socket’s insert the tree top into the pole [Fig 8] and shape by pulling the tips slightly down and curved upwards to meet the top layer of your branches. Complete all the way round in an even pattern (Some trees like the Oxford have a wire branch in the tree top which needs to be pulled down and curved slightly outward and upward)
To finish curve the front tips slightly upward to give a natural look and step back and observe if there are gaps in the branches and re-shape by either pulling the tip out, up, left or right to hide the visible gap.
From here the real fun begins with lighting your tree, adding decorations and of course the all important gifts under the tree.